Your First Picking Pattern
After you have learned to associate your fingers with particular strings,
you can begin to develop a coherent pattern of picking. The first pattern you
will learn is an arpeggiated C chord. This pattern can then be varied to fit
any musical requirement.
- Play the four strings listed on the previous page, in order, from low to high: 5th,
4th, 3rd, 2nd, as shown in Figure 1 below. Always use the correct finger for each
string.

- The correct fingers are shown below the tab: T=thumb,
I=index, M=middle, and R=ring. These designations are
used throughout the rest of the lessons.
- Use these same fingers for each repetition.
- Start very slowly at first. After the last exercise you should
be comfortable picking each string, but you must now train your hand muscles to
perform this pattern.
- Play this pattern repeatedly, until you can play it at a moderate speed.
The only way to learn this pattern and to train your hand is to repeat this
exercise many times.
- Remain on the C chord, because other chords require you to use other
strings.
- If you do not understand the tab notation in Figure 1,
click here.
- Once you have learned this first picking pattern, you
can begin changing your pattern.
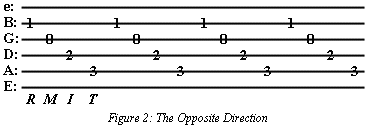
- Reverse this picking pattern; that is, play chords
from high to low, as in Figure 2. This pattern will require a bit more concentration
because you must now train your hand to do the exact opposite motion.
If this exercise is difficult for you, repeat the top exercise until you are comfortable
with it.

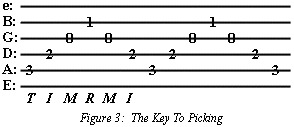
- Pick the chord from low to high and back down, as in Figure 3. Once you
have learned the above two exercises, this should be a bit simpler to do. However, it does
require integration of the above exercises, so if you can do this pattern you will be able to
play almost anything else you want.

-
Proceed
only when you feel comfortable playing Figure 3.
Move on to the fourth lesson!
Go back to the second lesson
You are visitor number
 since 2-15-97
© 1997 Daniel E. Smith.


