Changing Strings While Picking
Once you know how to change chords and move your fingers to accommodate the new chord,
we will begin to move your fingers around during chords. This becomes necessary when a
chord requires you to play more than four strings (such as G or F).
- We will look at the
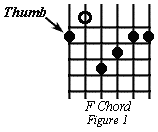
F chord first because the only finger that moves while picking it is the thumb. Try to make the
F chord shape shown in Figure 1.

- Place your four fingers on the first four strings as in a normal F chord,
then bring your thumb around the neck and thumb the first fret on your sixth string.
- This method of chord formation is better while picking because it is easier
and faster than using the barre chord F, and has a fuller sound than the simple
four-string F.
- Most fingerpickers wrap the thumb around to the sixth string for chords
which use the sixth string. This is a very helpful technique, which saves a lot of
time and hand strain. I use it on D/F# (200232), F (103211), and lots
of other chords.
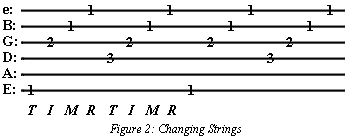
- Now play the picking pattern shown in Figure 2 using
the form of the F chord shown in Figure 1.

- Pick both the 6th string and the 4th string with your thumb.
- The purpose of this exercise is to get your picking fingers used to moving on the
strings, because most chords require you to do this, and if you want to make your patterns
musically interesting you will want to change strings.
- Once again, start slowly and work up to speed. This exercise should not be
difficult, but it should take time to get used to.
- Now play the pattern for a G chord as shown in Figure 3.
Like the F chord, G requires you to play more than four strings to get a decent sound.
However, the main difference is that instead of moving your thumb, you move the three fingers.

- Play this exercise like all the others. Use the following fingers:
thumb on 6th, then the remaining three fingers on the top three strings.
- These three strings will change during the measure
so you must move your fingers back and forth to accommodate the change.
- Obviously, start this one very slowly and work slowly up to speed.
- Do not get frustrated; keep at it and you will learn the pattern.
-
Proceed
only when you feel comfortable playing Figure 3.
Move on to the sixth lesson!
Go back to the fourth lesson
You are visitor number
 since 2-15-97
© 1997 Daniel E. Smith.


